If you want any kind of conversion (ie. make money) on your website, you need testing. Test one line of copy against the other, one picture against the other, to choose the winner and increase conversions. In this WordPress AB testing tutorial I’m going to show you, how to do website conversion testing (AB testing or split testing) easily with WordPress and the free testing tool of Google Analytics.

What is AB testing?
AB testing, aka split testing is the method of showing different versions of your website to different visitors in order to select the version with the highest conversion rate. One visitors sees one version (let’s call it A), the other sees another version (let’s call it B). This way the visitors are split between the versions, and you choose which one gets your more conversions. Hence the name “AB testing” or “Split testing”.
AB testing is not necessarily limited to only A and B versions. Sometimes C, D or even other version are tested at the same time. But for the sake of simplicity in this tutorial I’m going to limit myself to only two versions in testing, and show AB testing in its most common environment: testing conversions for landing pages.
In order to do a successful AB testing on your website, you need two different tools:
- Create different versions of the page to be tested (A and B).
- You need a testing tool that automatically shows different versions to different users – and maybe helps you calculate the winner.
WordPress AB testing 1st step: create your B version
With every AB testing the very first step is to decide what you exactly want to test. Generally it is recommended to test only one aspect of your landing page, but this can be as diverse as you can imagine. The most common aspects to test are:
- The copy. Be it the heading, the main copy or any text on your page.
- The look and feel of your landing page. Colors, design, different pictures, even responsiveness.
- The form on your landing page. The look and feel of the form, the button, the data to be collected.
So before anything else, you need to decide what you want to test and design your test page(s). This article is not about AB testing in general, so I’m not going to go into details. But it is recommended to only test one thing at a time.
When you have in mind your test version, it’s time to bring it to life.
Create your B version in WordPress:
- Write down your text to be tested. It’s OK to use a notepad or a word processor. If you are altering the design, make a scheme first. Be very bold at this step. Often times it is the version you least expect the one people’ll love the most.
- Create your test pages.
- If you only alter the text, make a copy of your original page (I recommend WordPress duplicate post plugin), then change the text and save the new page.
- If you make modifications to the design, first create a custom page template with the new design. Then copy your original page, and change the template for the new page.
- Publish your test pages. Now one will see them before the test begins.
As for the url of my new pages, I usually choose something easy to remember. If my original page is wpcookhouse.com/squeeze, then I choose wpcookhouse.com/squeeze-2 for the test version.
- I recommend you thoroughly test your new pages for any misspelling, different browsers (and maybe screen sizes and devices) and that your form submission works OK. It is a very bad idea to start an AB test just to realize later that your visitors are not able to subscribe.
WordPress AB testing 2nd step: configure Google Analytics experiment
Now you have your original version, and your B version published, it’s time to configure them to show different versions for different visitors. For this, there are different great tools out there, but I’m going to show you Google Analytics. It is completely free, and I think it is a great starting point in doing AB tests on your website.
- Log in to your Analytics account, and make sure you have a goal defined that you want to test. You can see, add or modify your goals by clicking Admin, then Goals. (Click on the picture to enlarge it.)
- Then go back to Reporting, and select Content -> Experiments. If this is not your first test, you’ll see a list of your previous tests. Click Create Experiment.
- Enter the URL for the page you want to improve (typically a squeeze page), and press Start Experimenting.
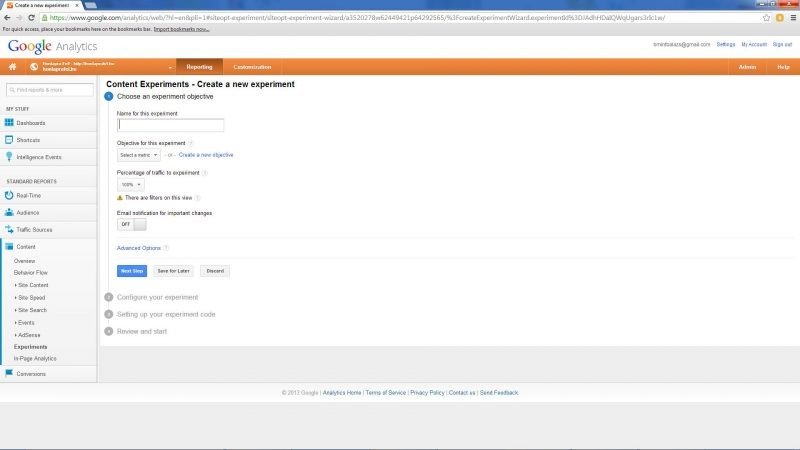
- Name your experiment. This is only for you to know what you are testing.
- Select a goal to improve, or create a new one. This is what you created or checked in step 1.
- Set the percentage of traffic to experiment.
If you set 50%, out of 100 visitors at least 50 will se your original version, and the remainig 50 will be split between your test versions, including the original.
My recommendation is to set this to 100% if it is a brand new squeeze page and you have no idea about the conversion rates of each version. And set it to 50% or even lower, if you already have a swaueeze page with decent conversion rates, and you want to test new ideas.
- Click Next Step when you are done.
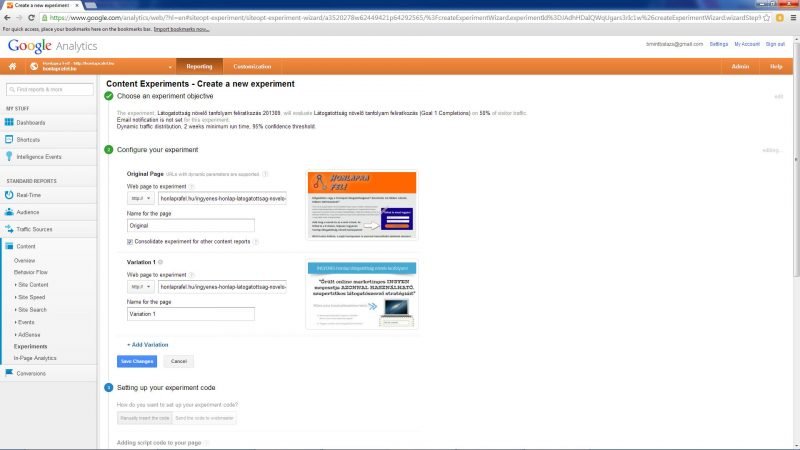
- Configure Your Experiment. Here is where you set your test versions.
- Original Page: You can change your page to be tested here, if you want, or give it a different name then “Original”.
- I suggest selecting “Consolidate experiment for other content reports“. This means than every visit on your landing page will be displayed in the Analytics reports as a visit to the original page, and you’ll be able to pinpoint the difference between the different versions in the Experiment.
- Add your test page in Variation 1 and rename it if necessary. Add the url of the test page to be displayed – this is the page that you created earlier in WordPress. Here you can specify a page even from another domain, but I think there is no use for that. What is great in WordPress AB testing is that you can define variations with tiny differences, or even with a completely different design, see it above.
- You can add up to 9 variations here.
- Setting up your experiment code.
Here is the trick where lots of first time WordPress AB testers think it is a difficult process. But it ain’t at all.
In this step Google Analytics gives you a code to insert into your website’s source in order to alter the content for different visitors. You should select “Manually insert the code” – see the picture above. Then you get a few lines of code that you need to add to your original page’s header, right after the opening heading tag at the top – and here is when the trick of page templates of WordPress comes in handy.
WordPress AB Testing 3rd step: configure your original page in WordPress
Don’t close your Analytics window yet, we’ll come back later to start the experiment.
- Create a new page template in WordPress, a simple copy of the template of your original page (the one you want your newer versions to test against). My original page uses my “Squeeze” template, so I make a copy of my page-squeeze.php file, and call it page-squeeze.experiment.php and give it a template name of “Squeeze Experiment“. You can use any name you want.
- Create a new header file for your experiment template. Make a copy of your original header file for the squeeze page (header-squeeze.php in this case), and rename it header-squeeze.experiment.php.
- Open the php file of the new experiment template, page-squeeze.experiment.php in this case. Change the template name to “Squeeze Experiment“. Also find the line where the header file is loaded – hopefully using the “get_header” WordPress function. Change the header file name to be loaded to “squeeze.experiment“. This will load header-squeeze.experiment.php.
The first lines of your page-squeeze.experiment.php file will look like this:
Don’t change anything else in your page file.
- Open your header-squeeze.experiment.php file and find the opening ‹head› tag. Right after this opening head tag copy and paste the AB test code from your Analytics account.
- Upload the page and header php files to your server.
- Open your original page in WordPress editor, and select Squeeze Experiment as Page Template. Save this page – hit Publish.
- Publish all of your unpublished experiment pages. Don’t use the experiment template (with the Analytics experiment code) for your experiment pages, only for the original.
WordPress AB Testing 4th and final step: Release your experiment
- When you’re done with everything, go back to your Analytics accoun, the experiment setting page still open, and Click Next Step to continue. You can add any comment to your experiment here if you want. Your new WordPress AB Testing experiment with Google Analytics is ready to go.
Analytics will test if your test pages are alive (published) and if your original page has the little test code in the source.
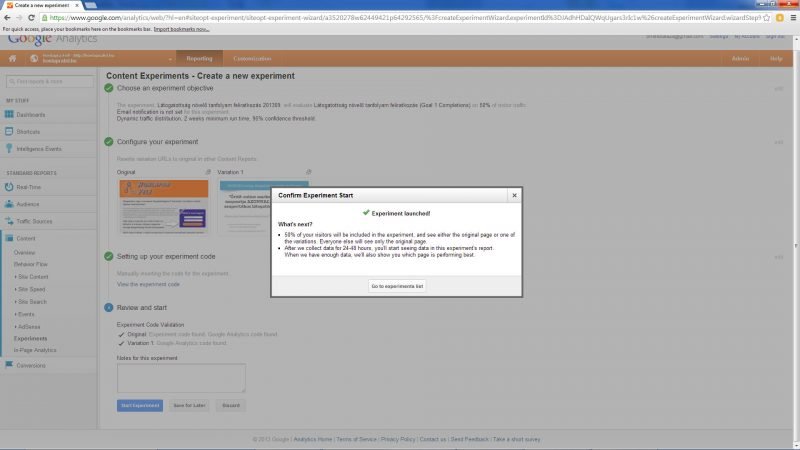
- Click Start Experiment. A confirmation window will appear, telling that Google Analytics has started running your experiment.
- Congratulations! Your WordPress AB testing experiment has been launched!
What’s next?
Your visitors will randomly see the different versions of your squeeze page. Analytics will record every visit and compare the conversion to the goal set. Just open your Analytics account and go to Content -> Experiments in the reporting section to see how your experiment is performing.
After a while – depending on the number of your visitors and the difference in performance between the test versions – Google Analytics will close the experiment and announce a winner.
It’s up to you to accept this winner, try other versions or even keep the original one. This is another story, how to evaluate AB Tests and you can read a lot of great articles about this online.
Two little steps I’d like to mention, which is important after your experiment is over:
- Remove the test code from the header of your original page. You can either delete the script from your file, or set back the original page template.
- Unpublish or delete the test versions of your page. This way you ensure that you won’t get any penalty from Google for duplicate content.
Good luck with your online experiments in WordPress, and let me know how your tests perform in the comment section below.
Document images courtesy of photosopedia.com and doublejdesign.co.uk by IconArchive.


