
Starting a blog has never been easier. With some awesome easy-to-use online tools I’m about to show you in this article, you can start your own blog in literally 20 minutes, with no technical skills.
Imagine, just sitting at your desk, clicking some nice buttons, and in 20 minutes from now you could not only have started your own blog, but even published your first blog post.
But how is this possible? Let’s get to the work, and see how to start a blog in 2021!
4 Easy Steps To Create A Blog In 2021

- Step 1. Choose your domain and set up hosting
- Step 2. Install WordPress – the world’s best FREE blogging software
- Step 3. Set up your theme – dress up your blog and show the world your character
- Step 4. Write and publish your first blog post
It is as easy as it gets. No worries, no fuss, no technical skills. 20 minutes to publish your first blog post, and now let’s see how!

Starting A Blog #1: Choose Your Domain and Set Up Hosting
First things first. My advice is to avoid free blogging platforms. When using your own domain, you have so much more flexibility and more opportunities. You can choose from thousands of website themes, you’ll have your own domain, and if later you decide to monetize your blog, no way you can do it using a free platform.
The only downside of having your own domain is the cost of the domain and hosting. But that’s under $10 per month at Bluehost, the service I’m using. And come on! If you really think this blogging idea seriously, don’t tell me that you let the price of two Chocolate Mochas per month get into your way?!
Start With Choosing Your Domain Name
Your domain name will be the address of your blog. Like WPCookHouse.com in my case.
Choose something that is easy to remember. In the long term, blogs with unique, brandable names generally outperform those domain names where you only stitch some words together.
You can even start down below in this box, checking if your preferred domain name is still available. (Enter your preferred domain name and click on “Check availability“, it’ll open in a new window.)
Bluehost will check if your domain is available. If not, you’ll be prompted to try another domain name. Just type in another idea into the input field marked red and hit “next:.

If your desired domain name is available, you are ready to set up your hosting account. This is basically a small portion of a web server, a computer that will be online 24/7 with your blog.
Type in your personal data in order to start your plan (Bluehost gives you a 30 days money-back guarantee), your payment information, and select your package settings.
Some tips on choosing the right package and options for you:
- With the Basic plan you can host 1 domain, and that’s all you want when starting your first blog.
- Don’t worry, you’ll be able to change your plan later, should you decide to start another blog. That is, you don’t need to start a new plan for each domain, you can host more than one domains under one Bluehost account.
- If you plan your blog to be online for years, you can choose a 24 or 36 months plan, saving on your monthly prices.
- I would turn off every other features, should this be my first blog. You won’t really benefit from them. But feel free to read the information provided on the extra features, and choose according to your preferences.

Once you hit submit and complete your registration, you’ll receive an email with the details on how to login to your web hosting control panel (cPanel). This is all you need to get to the next step, to install your free content management system (CMS, the web program that manages you blog’s content).
Please note that when you install your Bluehost account via my website, I get a small amount for the recommendation. But I recommending Bluehost because I am using their service. In fact this very site that you are reading runs on Bluehost servers right now.
Starting A Blog #2: Install WordPress
Log in to your Bluehost cPanel, simply click on the “Install WordPress” icon to begin the extremely easy installation.

Sometimes here you see an advertisement of the Bluehost Marketplace, but just simply hit “Get Started” to proceed with the installation.
In the next step you’ll be prompted to select your domain to install WordPress on. If this is your first domain, you won’t have many options here. The only option is whether to use www or not – which is totally up to you. Select your domain and hit “Next“.

Bluehost will prompt you to set up your Website’s name, your username, email and password. You can always change these later in your WordPress admin panel, except your admin username.
So fill in these fields, check everything that needs to be checked, and hit “Install“.

Your WordPress is now being installed. In the meantime you’ll be prompted some ads again to choose a premium WordPress theme from the marketplace. No need for that, I’ll show you later how to install a beautiful theme for free.
When your install is ready, you’ll be prompted the most important information about your installation. Your blog’s admin page will be accessible at http://yourdomain/wp-admin. Navigate to that page, and login with your previously entered credentials.
Good news, your blog is already is up and running. All you need is to select a theme to make it look nice, and start blogging.
Starting A Blog #3: Set Up Your Theme
A theme is like a dress to your blog. If you look at your new blog right now, it’s working, but it’s pretty simple. Time to dress it up!
For your WordPress blog, you can choose from free and premium themes. When starting your first blog, I recommend you choose a free theme. They are super easy to install, and you can always change them later.
You can browse all the available free WordPress Themes at the WordPress repository, and choose the one that fits you best. Choose a theme, click on the “Theme Homepage” link, and see a live demo if available.
To install a theme, go to your WordPress admin panel. Click “Appearance » Themes“, then hit “Add New“.

You can browse free themes here, or simply enter the name of your preferred theme at the search box in the upper right corner.
Here are a few tips of free WordPress plugins that I’ve been using lately, and I can totally recommend them to you:
- My favorite currently is Customizr.
- Galanight is a nice and stable free theme.
- HarmonUX Core is also very nice if you have great pictures to show in your blog.
First hit “Install“, and your theme will be downloaded and installed automatically.
Once finished, hit “Activate” to use the selected theme.
That’s all. Your free WordPress theme is live, and you’re ready to publish your first article.

Starting A Blog #4: Write And Publish Your First Post
Believe it or not, you’re really ready to write and publish your first blog post.
On your WordPress admin panel click “Posts » Add New“.
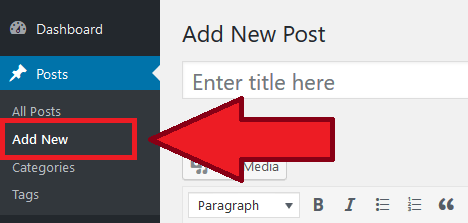
WordPress comes with an easy-to-use visual editor, so you can write your posts as you would do in Word.
Give your first post a nice title, and start typing the text. You can use a lot of formatting options, and you can easily add some pictures to your posts to make them stand out.
Here is an example of a first blog post that you can publish literally in a minute:

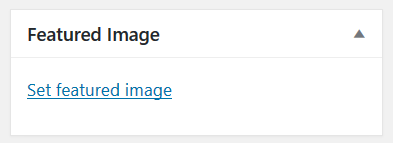
As an extra, you can set a featured image or thumbnail picture to your blog post. This will be the picture that people see on your homepage, and at the top of your post.
You can find this option at the bottom right corner. Simply click on “Set featured image“, and upload or select the image that best describes your post.
Are you ready? Are you really ready?
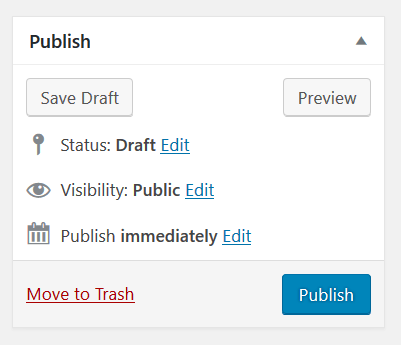
There is nothing more left out to publish your first post and really start your new blog.
Simply hit “Publish” (upper right corner), and your first post goes right live in the air.
One more advice though. After publishing your first post, go back to “Posts » All posts“. Find and delete the very first post WordPress created for you during installation. It is titled “Hello World!“
Visit your brand new blog by clicking on the small house icon in the upper left corner.
Congratulations! You’ve not just learned how to start a blog, but created your very first blog post in less than 20 minutes!
P.S. Is This All You Need To Know?
Of course not. Though it is very motivational to see your first post in a few minutes, you’ll immediately start to think on how to improve your blog.
The easiest thing is to go to “Themes » Customize“, and try all the possible setting of your theme.
Blogging is one part of the equation. Your blog only stays live if you keep on publishing. Don’t worry about the content or the quality at the beginning. Believe me, no one is proud of their first blog posts. 🙂
Tweaking your website, installing plugins for more functionality, learning how to get visitors from search engines are also important. Read my WordPress Initial Setup Tips and 11 WordPress SEO Tips to give a kick start to your blog.
