
Google Analytics is a very powerful tool to monitor your website’s performance. It is completely free, and installing it on your WordPress website or any other CMS (Content Management System) is very easy. In this post I’m going to show you how to install Google Analytics step by step by step on your WordPress website or blog.
How To Install Google Analytics On WordPress – Video
Well, the easiest way to understand how to install Google Analytics on WordPress is definitely by a tutorial video. Check out this one, and chances are you don’t even need to scroll down further.
How to install Google Analytics #1: Get a free Google Account
I think everyone has a Google account (eg. for Gmail), but if for any reason you don’t, just register a Gmail account or go to the Google Analytics Website and click “Create an account” and follow the simple steps.
How to install Google Analytics #2: Sign in to you Google Analytics account
Following the link to the Google Analytics website, you can sign in with your existing Google account. Click “Sign in” in the upper right corner and use your Google credentials.

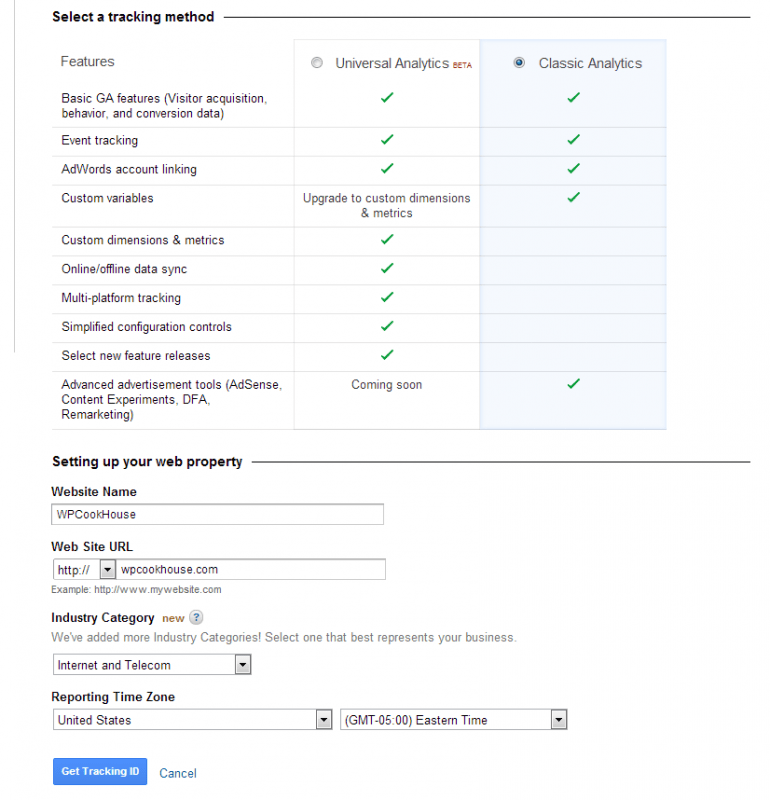
Once you’re signed into your Google Analytics account, click on Admin at the upper right corner then create a new account. This is not the same as your Google account, it’s an Analytics account to keep track of one or more websites. Also you can share your data with specific users later within one account.
The process is very straightforward here, and I’d like to show you more about how to actually use your Analytics account. At the time of publishing this post, I recommend you choose the Classic Analytics settings. Name your property, enter your url, provide your industry and timezone. Now click on Get Tracking ID and you’re good to go on the Google side.
How to Install Google Analytics tracking ID
Now you’ve been redirected to a page where you can see your new Google Analytics tracking ID. This looks like UA-XXXXXXX-YY, where XXXXXXX is your account’s ID, and YY is the ID of your property (or website).
Your Google Analytics tracking ID is not something that works by itself. It needs to be installed (or better said embedded) in every single page of your website that you want to track. This way when someone visits one of your pages, the Analytics code gets “activated” so Google can keep track of your visitors.

You have several different ways to install this ID on you website in order to Google keep track of every occasion when someone visits your site.
Recommended for WordPress users: using Google Tag Manager with a Free Plugin
If you’re using WordPress and don’t want to tweak your code (see possibilities below), the way to go is to use Google Tag Manager. This is another free service from Google, and fortunately you have a nice free plugin to install it on your website.
Check out this video on how to install Google Tag Manager on your WordPress website. Scroll down for the links mentioned in the video. Also you can find a more detailed tutorial on how to get Google Tag Manager code and add to your WordPress website by clicking on this link.
Links mentioned in this video:
Setting up Google Analytics Inside Your WordPress Theme
Sometimes your theme provides an option of entering your tracking code. It’s as easy as is, simply enter the whole tracking code (with the script part), hit OK and you’re good to go. It’s all the same except that you’ll lose the extra functionality of the Yoast plugin.
Add Google Analytics Tracking Code Manually
You can also edit your code and embed the GA tracking code. For this you need to edit your header section, right before the </head> tag in your HTML – that’s usually in the header.php file in WordPress. Simply copy-paste the whole tracking code just before the closing head tag.
Please note that if you are not using a child theme, after the next theme update your Analytics tracking code will disappear.
Also if by any reason your theme uses more than one header file, you have to place the tracking code in each one of them. A better solution might be to create a function to add you GA code, and add this to the wp_head hook.