WordPress is a very powerful tool for any website. In this article, I’m going to show you the nuts and bolts of WordPress initial setup with the 9 most important tips. I hope I can help you set up your WP site smoothly and also bring in targeted traffic from search engines and other sources.
You can, and in most cases you should, change some of these settings later as your site evolves and you’ll get to know WordPress better. But if you follow this simple WordPress initial setup process, you can be sure that your site will be up and running in no time.
Table of Contents
Follow these 9 steps of WordPress initial setup:
- Permalink Settings
- Change how Your Name Is Displayed
- Setting Your Website’s Name and Tagline
- Rename Your Default Category
- Media Settings
- Date and Timezone Settings
- Set up Your First Menu(s)
- Search Engine Visibility
- Must Have Plugins
WordPress Initial Setup 1: Permalink Settings
One of the first and most important things you need to change during WordPress initial setup is the permalink structure. This is basically the structure of the string what comes after your domain name in the URL of your pages or posts in the browser.
For example, the permalink of this article that you are reading right now is wordpress-initial-setup/
The initial WordPress setting is very ugly, a code like http://yoursite.com/?p=1283. This works in the browser, but readers and most importantly search engines don’t like it very much. It is not nice, not readable, doesn’t tell anything about the content of the page.
To fix this, go to Settings » Permalinks in your WordPress admin panel and change your permalink structure to preferably “Post name“. For most advanced users, you can choose any other setting but the plain one if you know what you are doing. But if you’re new to WordPress, simply select “Post name”.
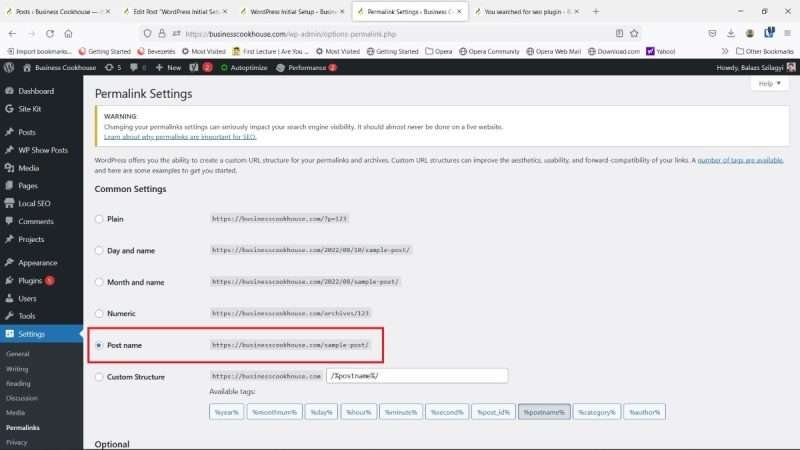
Note that the warning at the top of my screenshot comes from my SEO plugin. It is true that changing the permalink structure for an already established website can be quite dangerous for SEO reasons, that's why you want to do this step right at the beginning.
WordPress Initial Setup 2: Change how Your Name Is Displayed
As a very first step of your WordPress initial setup, you should change how your name, as the author, is displayed in blogposts and articles.
By default WordPress is displaying your username at the top of your posts as the author. Many times this is simply admin or administrator, or even if you create your own username it’s usually not very expressive.
In most cases what you want to display is your real name or a nickname other than your login name. This is good practice for connecting with your audience and building your brand as an authority in your niche.
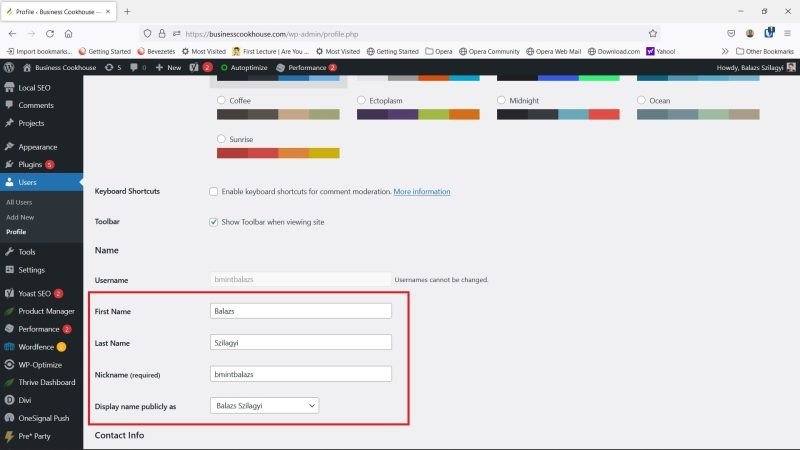
In order to display your name properly, go to Users » Profile, fill out First Name, Last Name and Nickname, and simply select how you want your name to appear at “Display name publicly as“.
WordPress Initial Setup 3: Setting your Website’s name and tagline
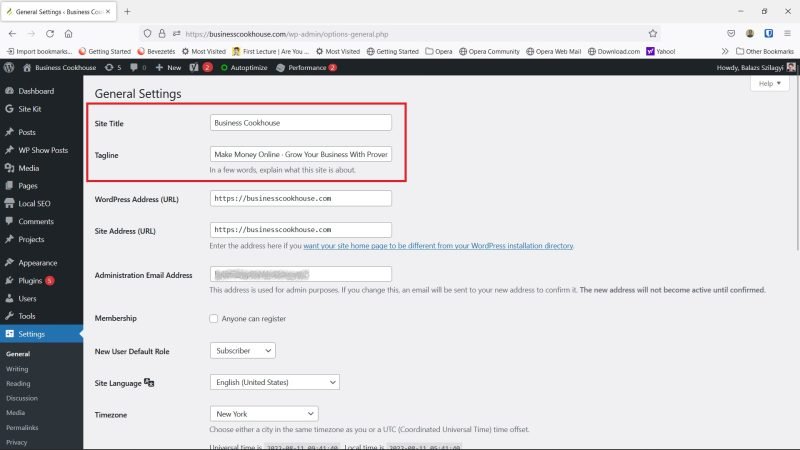
Under Settings » General, the first two things you find are Site Title and Tagline. These are actually very important yet often overlooked settings that you should handle right at your initial setup process.
For Site Title, you should simply set your website’s name. For Tagline, you can use your most valuable keywords separated by commas. You can always change these later, but I think these initial settings are much better than the WordPress default “Just another WordPress site“.
You can find much more useful information on this topic in my other articles. Check out how tagline SEO can affect your rankings and how to set up your tagline correctly.
WordPress Initial Setup 4: Rename your default category
WordPress comes with the very useful option of categorizing your posts. The drawback of this functionality is that you must include every post in at least one category.
This is very useful for an established website, but not easy at all in the beginning, when you’re only planning your posts, not even thinking about how to organize them. But the default category name “uncategorized” is so ugly that you don’t want to leave it that way.
I suggest you use a category name that is descriptive to your first posts, ideally including some of the keywords that you want to target later with SEO. Eg. for a food blog, it’s a good idea to choose “recipes“. If you have no better idea, choose something like “ideas” or even simply “Blog“.
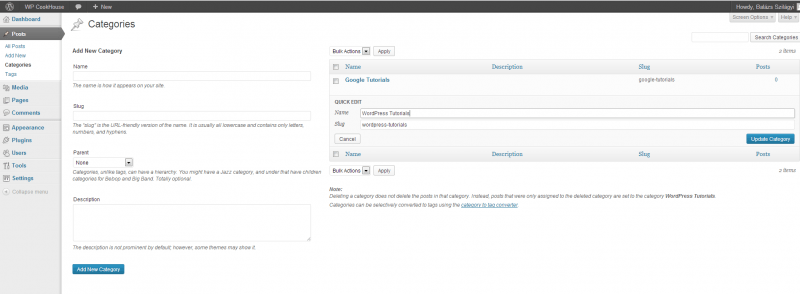
Go to Posts » Categories, move your mouse over the category name “uncategorized“, then select Quick Edit. Change the name as stated above. You should also change the slug for that category. This should be the same as the category name, but without special characters and with dashes instead of spaces. Simply click “Update Category” and you’re good to go.
WordPress Initial Setup 5: Media Settings
Change the default media sizes
WordPress uses different media sizes to display your images on your website. Although the default settings will work, it is recommended to change these according to the size of your actual WordPress theme.
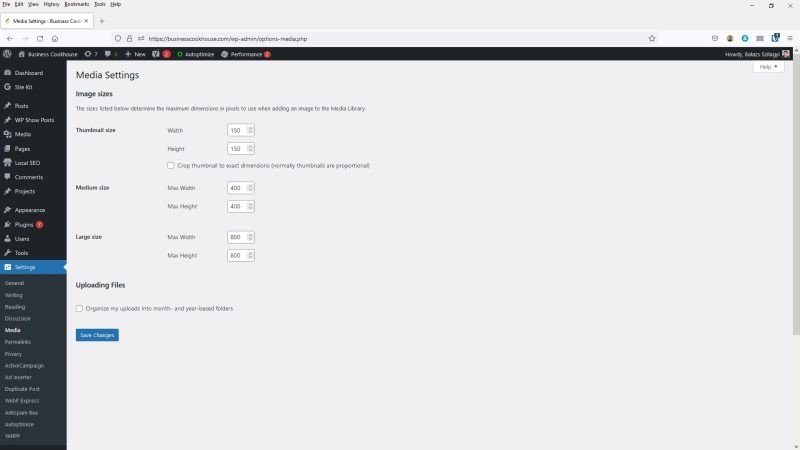
Go to Settings » Media to change these settings.
- If you now how to find your article div width in pixels, use that for Large size and about 60% of that for Medium size.
- If you don’t now how to find the width of your articles, use 800×800 for Large size and 480×480 for Medium size.
Whether to Organize Media Files Into Subfolders
In the above picture in Media Settings, you see another option: Organize my uploads into month- and year-based folders. For this, I usually follow this simple rule:
- If the site in question is planned to be a media-heavy website, i.e. more than 50-100 images per month, leave this option checked. This will make it easier to download your recent media files during backup.
- For any other websites, you should uncheck this option. This will produce shorter URLs (web addresses) for your image files.
WordPress Initial Setup 6: Date and Timezone Settings
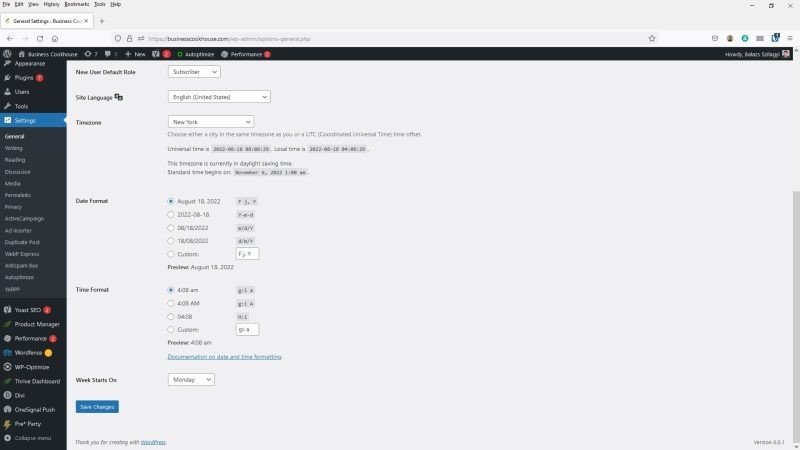
After installing WordPress, it is always a good idea to set your date and time settings. Go to Settings » General to apply the following tips.
- Timezone is always set to default, so you should set it to your location. This affects what date and time for your articles is shown and some other time-based functionality.
- Check whether the Date Format and Time Format is correct.
WordPress Initial Setup 7: Set up Your First Menu(s)
Every WordPress theme comes with at least one built in menu. To make this work, you have to configure your main menu, otherwise an automatically generated list of all of your pages will be shown in your main menu.
This is a very simple process, just follow these steps after you’ve selected and applied your desired WordPress theme:
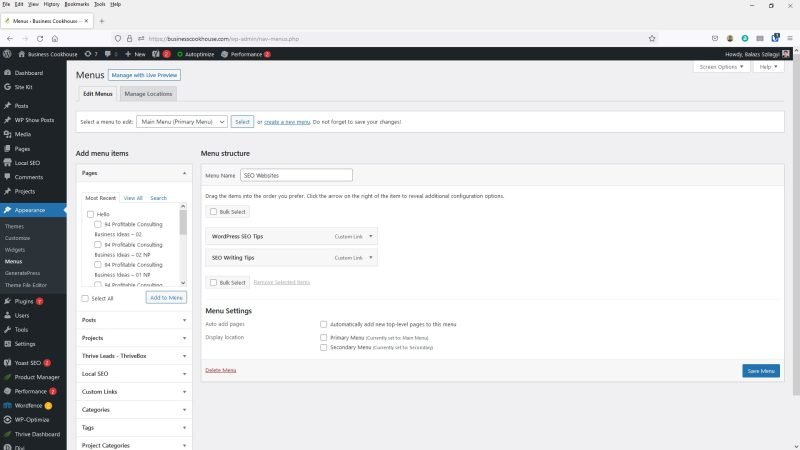
- Go to Appearance » Menus.
- Name your first menu (at Menu Name). Take whatever name you want, I usually use “Main Menu” so it’s descriptive enough for me to know where it should be used.
- Click on “Create Menu“.
- Under Menu Settings, check the box where it says “Display locations” for your menu to show up. The name there depends on your theme, usually Main menu, Menu, Primary Menu, or something similar.
- You can drag and drop pages, categories, custom links etc. to build your menu.
- Save your new WordPress menu bu clicking Save Menu.
WordPress Initial Setup 8: Search Engine Visibility
Everyone wants to be discovered by search engines and show up on the first page of SERPs for as many keywords as they can. But this is not an easy task and I can assure you that if you don’t even let search engines to discover your site, then you have no chance to rank at all.
That’s why I always turn on search engine visibility right as the very first step when installing a WordPress site.
Being discovered is one thing, and getting results or rankings is another one. So don’t be afraid to be displayed in the search results with an incomplete site; for that you need great content. But if you discourage search engines to discover your website, you delay the chances of getting good rankings later.
On the other hand, if you let search engines to crawl your new WordPress website from the very beginning, you’ll have an advantage to get good rankings later once you’ll have excellent content.
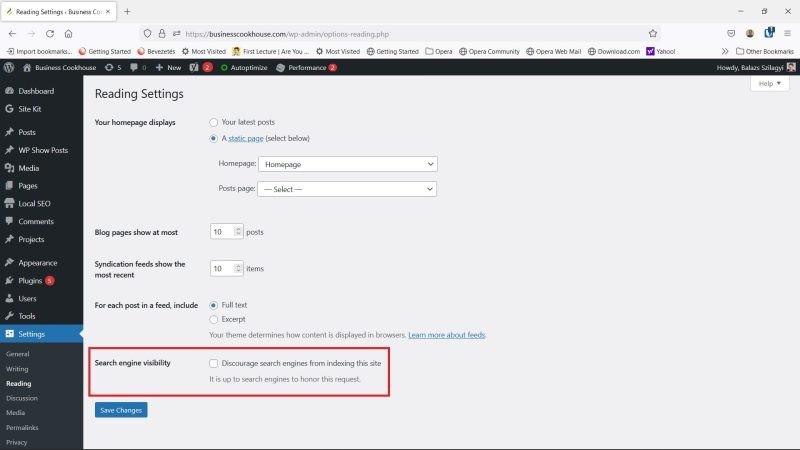
To turn on search engine visibility during WordPress initial setup, you have two options.
- First you are asked about this in the setup process itself. I advise you to simply let search engines to discover your website in this stage. As I mentioned before, no risk of an incomplete site being shown up in search results.
- The other option is to go to Settings » Reading, and uncheck “Discourage search engines from indexing this site“. Please note that for Google it takes generally a couple of weeks to discover your site and index it after unchecking this option.
WordPress Initial Setup 9: Must Have Plugins
Plugins are an essential part of any WordPress website, adding the functionality that you really need. This article is not intended to be a guide on WordPress plugins, that’s a much broader topic.
But I put together a simple list of the plugins that I always install on any WordPress website right at the initial setup process. These plugins are well tested and they provide general functionality that will be useful no matter what special needs you’ll have later when fine tuning your website. And best of all, these are all free!
- YOAST SEO. This is a must if you want your website to show up in search engines.
- Antispam Bee. I find this being a much better option that the preinstalled Akismet (I simply delete the latter). And if you start publishing you’ll definitely need an antispam plugin.
- Wordfence. This is a security plugin to keep your WordPress website safe. Even the free version is an excellent solution, and just by turning it on you’ll get crucial protection.
- Cookie Notice. In our data-crazy world you’ll need some kind of cookie notice plugin. I use and recommend this one.

