Google Tag Manager (GTM) is a very easy tool to handle your different codes that you might want to use on your website. Codes include such as your Google Analytics tracking ID, Facebook or AdWords codes for remarketing and conversion tracking, Google Search Console verification etc.

The best thing about Google Tag Manager is that you only have to install one code on your website, be it WordPress or any other type of site. And usually this is the trickiest and most difficult part for most website owners, to tweak the actual code of their website in order to include a tracking code.
In this article, along with a tutorial video, I’m going to show you how to get a Google Tag Manager code, and how easy it is to install it on your WordPress website with a free plugin.
Tutorial Video: How To Get Google Tag Manager Code And Install It On Your WordPress Website
In this video I’m going to show you the whole process of getting your Tag Manager Code, and installing the necessary WordPress plugin. Continue reading to see the whole process explained in this article.
Sign Up With Google Tag Manager
The very first step you need to do in order to get your Google Tag Manager Code, is to sign up with Google Tag Manager. This is completely free and takes only about a few seconds.
- First click this link and open the Google Tag Manager website »
- Click on Sign Up For Free to open up your Tag Manager dashboard.

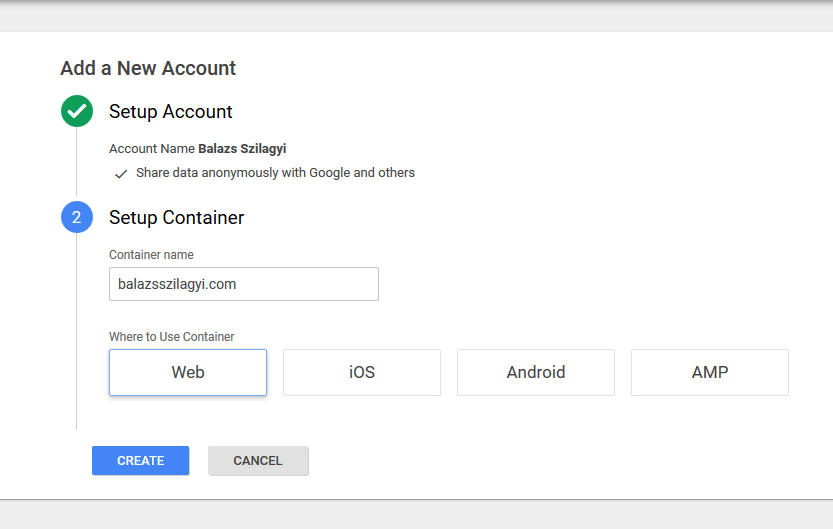
- Next you need to set up a new account. Just type in the account name – e.g. your name or company name. You can select Share data anonymously with Google and others.

- Next step you set up your first Tag Manager container. Simply type in a name for your container – e.g. your website name or domain. Then select the type of container. For most of my readers this will be Web, as you want to use your Google Tag Manager code on your website.

- The last step is to read and accept the Google Tag Manager Terms of Service Agreement. Simply click yes if your OK with it.
Your basically good to go. Your Google Tag Manager account is live and set up. Your Google Tag Manager code is displayed on your monitor, and next step you need to add that code to your website.
How To Add Google Tag Manager Code To Your WordPress Website
You have two options to add this code to your website:
- You can tweak your code or call a developer to add it directly to your source code. This is not that difficult if you know php and html, but for most people understandably this is the scary part.
- The easy way: using a free WordPress plugin.
I’m going to show you how to add your Google Tag Manager code using the free plugin, DuracellTomi’s Google Tag Manager for WordPress.
- First install this plugin to your WordPress website: DuracellTomi’s Google Tag Manager for WordPress
Check out my video to see how to install WordPress Plugins.
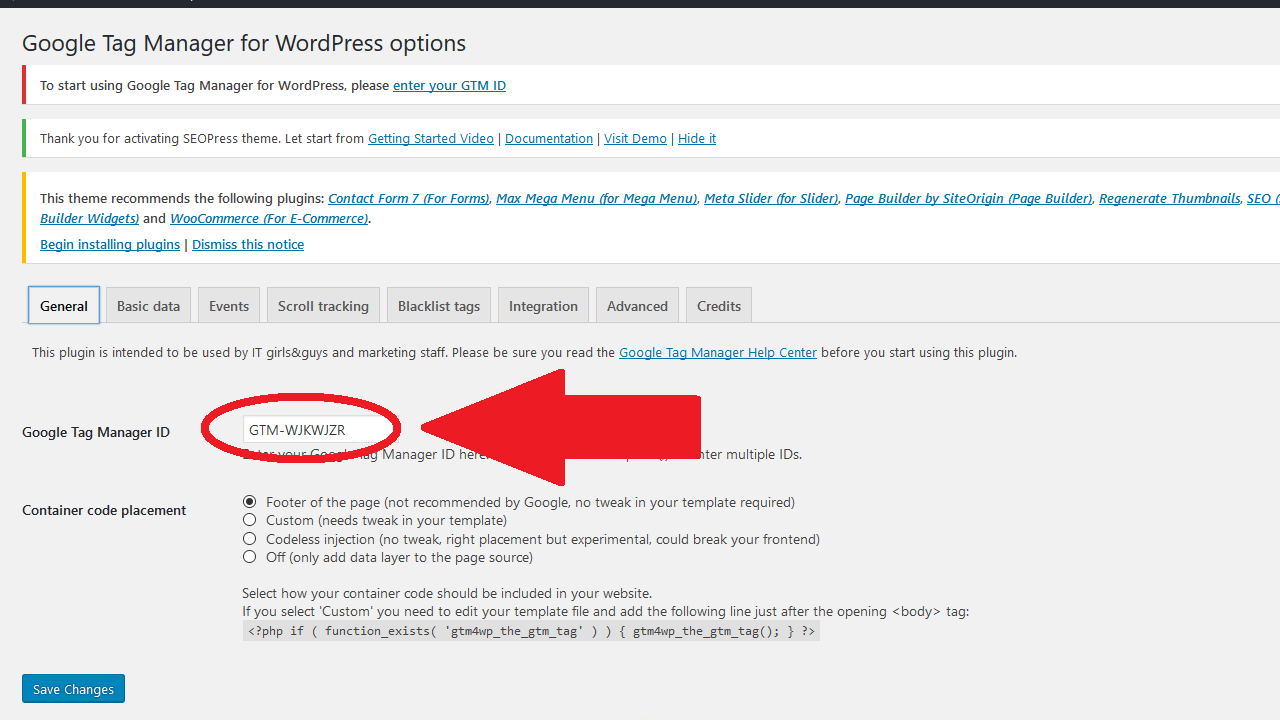
- In the upper part of your WP dashboard, you’ll see a red flagged message “To start using Google Tag Manager for WordPress, please enter your GTM ID“. Simply click on the link where it says “enter your GTM ID“.

- You can find your Google Tag Manager ID at the upper right corner of your GTM dashboard, it looks like GTM-XXXXXXX. Copy that ID and paste it in your plugin.

- Next step select the way you want your GTM code to be included in your websites’s source code. The first option (Footer of the page) is the safest, but you can go ahead and try the third option (Codeless injection) as I did with my website. Just make sure you check if your website is still working once you’ve clicked Save changes.
Don’t worry, if your website is not working, simply go back to the Google Tag Manager for WordPress options, and select the footer option.
- Click Save Changes to install your Google Tag Manager code on your WordPress website.
GTM Code Is Installed
Your GTM code is installed on your WordPress website and ready. But please keep in mind that this is still the empty code. Unless you add a tag to your Tag Manager container and unless you publish your first container, it won’t do anything.

